
Floral Foam Alternative
Follow my journey through my first attempt at a floral foam alternative, in the form of reusable “moss logs”.
As you may already know, if you’ve been following my journey in flowers, I am always looking for eco-friendly ways of arranging and creating. This dedication to being “eco chic” isn’t without its challenges though, a lot of times it means looking for out-of-the-box solutions for well established industry standards. For instance, a long time staple in the floral industry is that nasty green stuff called floral foam…
I call it nasty, because if you are a craft store junkie like me, inevitably you’ve run across floral foam before. Most of the time, the blocks are either already crumbling, leaving a fine green dust behind, or are laden with mystery fingerprints, like some sort of a floral crime scene.
At times it seems like there is literally nothing cute about traditional floral foam…
It makes a mess.
It is only good for one use (talk about throwing away money).
And it’s just a block of plastic with air bubbles, so it doesn’t break down in the dump after it’s been tossed.
Don’t get me wrong though, there are some pretty amazing benefits associated with floral foam as well, such as…
It provides a great, consistent water source, making it ideal for installations.
It is SUPER easy to arrange in… once you stick a stem in the foam, it isn’t going anywhere.
And it’s accessible - any floral wholesaler or craft store will have options available, so even if you’re in a pinch it’s an easy-to-access solution.
So when it comes to finding the right eco-friendly alternative for this long-standing industry staple, it’s not a small task…
What solution combines all of the great things about floral foam, while leaving out some of the nasty environmental impacts?
After researching and pulling together some tips and tricks I found, I decided to try my hand at what I lovingly call “moss logs” as a floral foam alternative. Just to be clear, I am not the first florist by any stretch of the imagination to use this technique, but I wanted to share my full process here so it’s all in one place. I had a hard time finding a comprehensive look at how to make a moss log, so I thought it would be worth sharing my journey here.
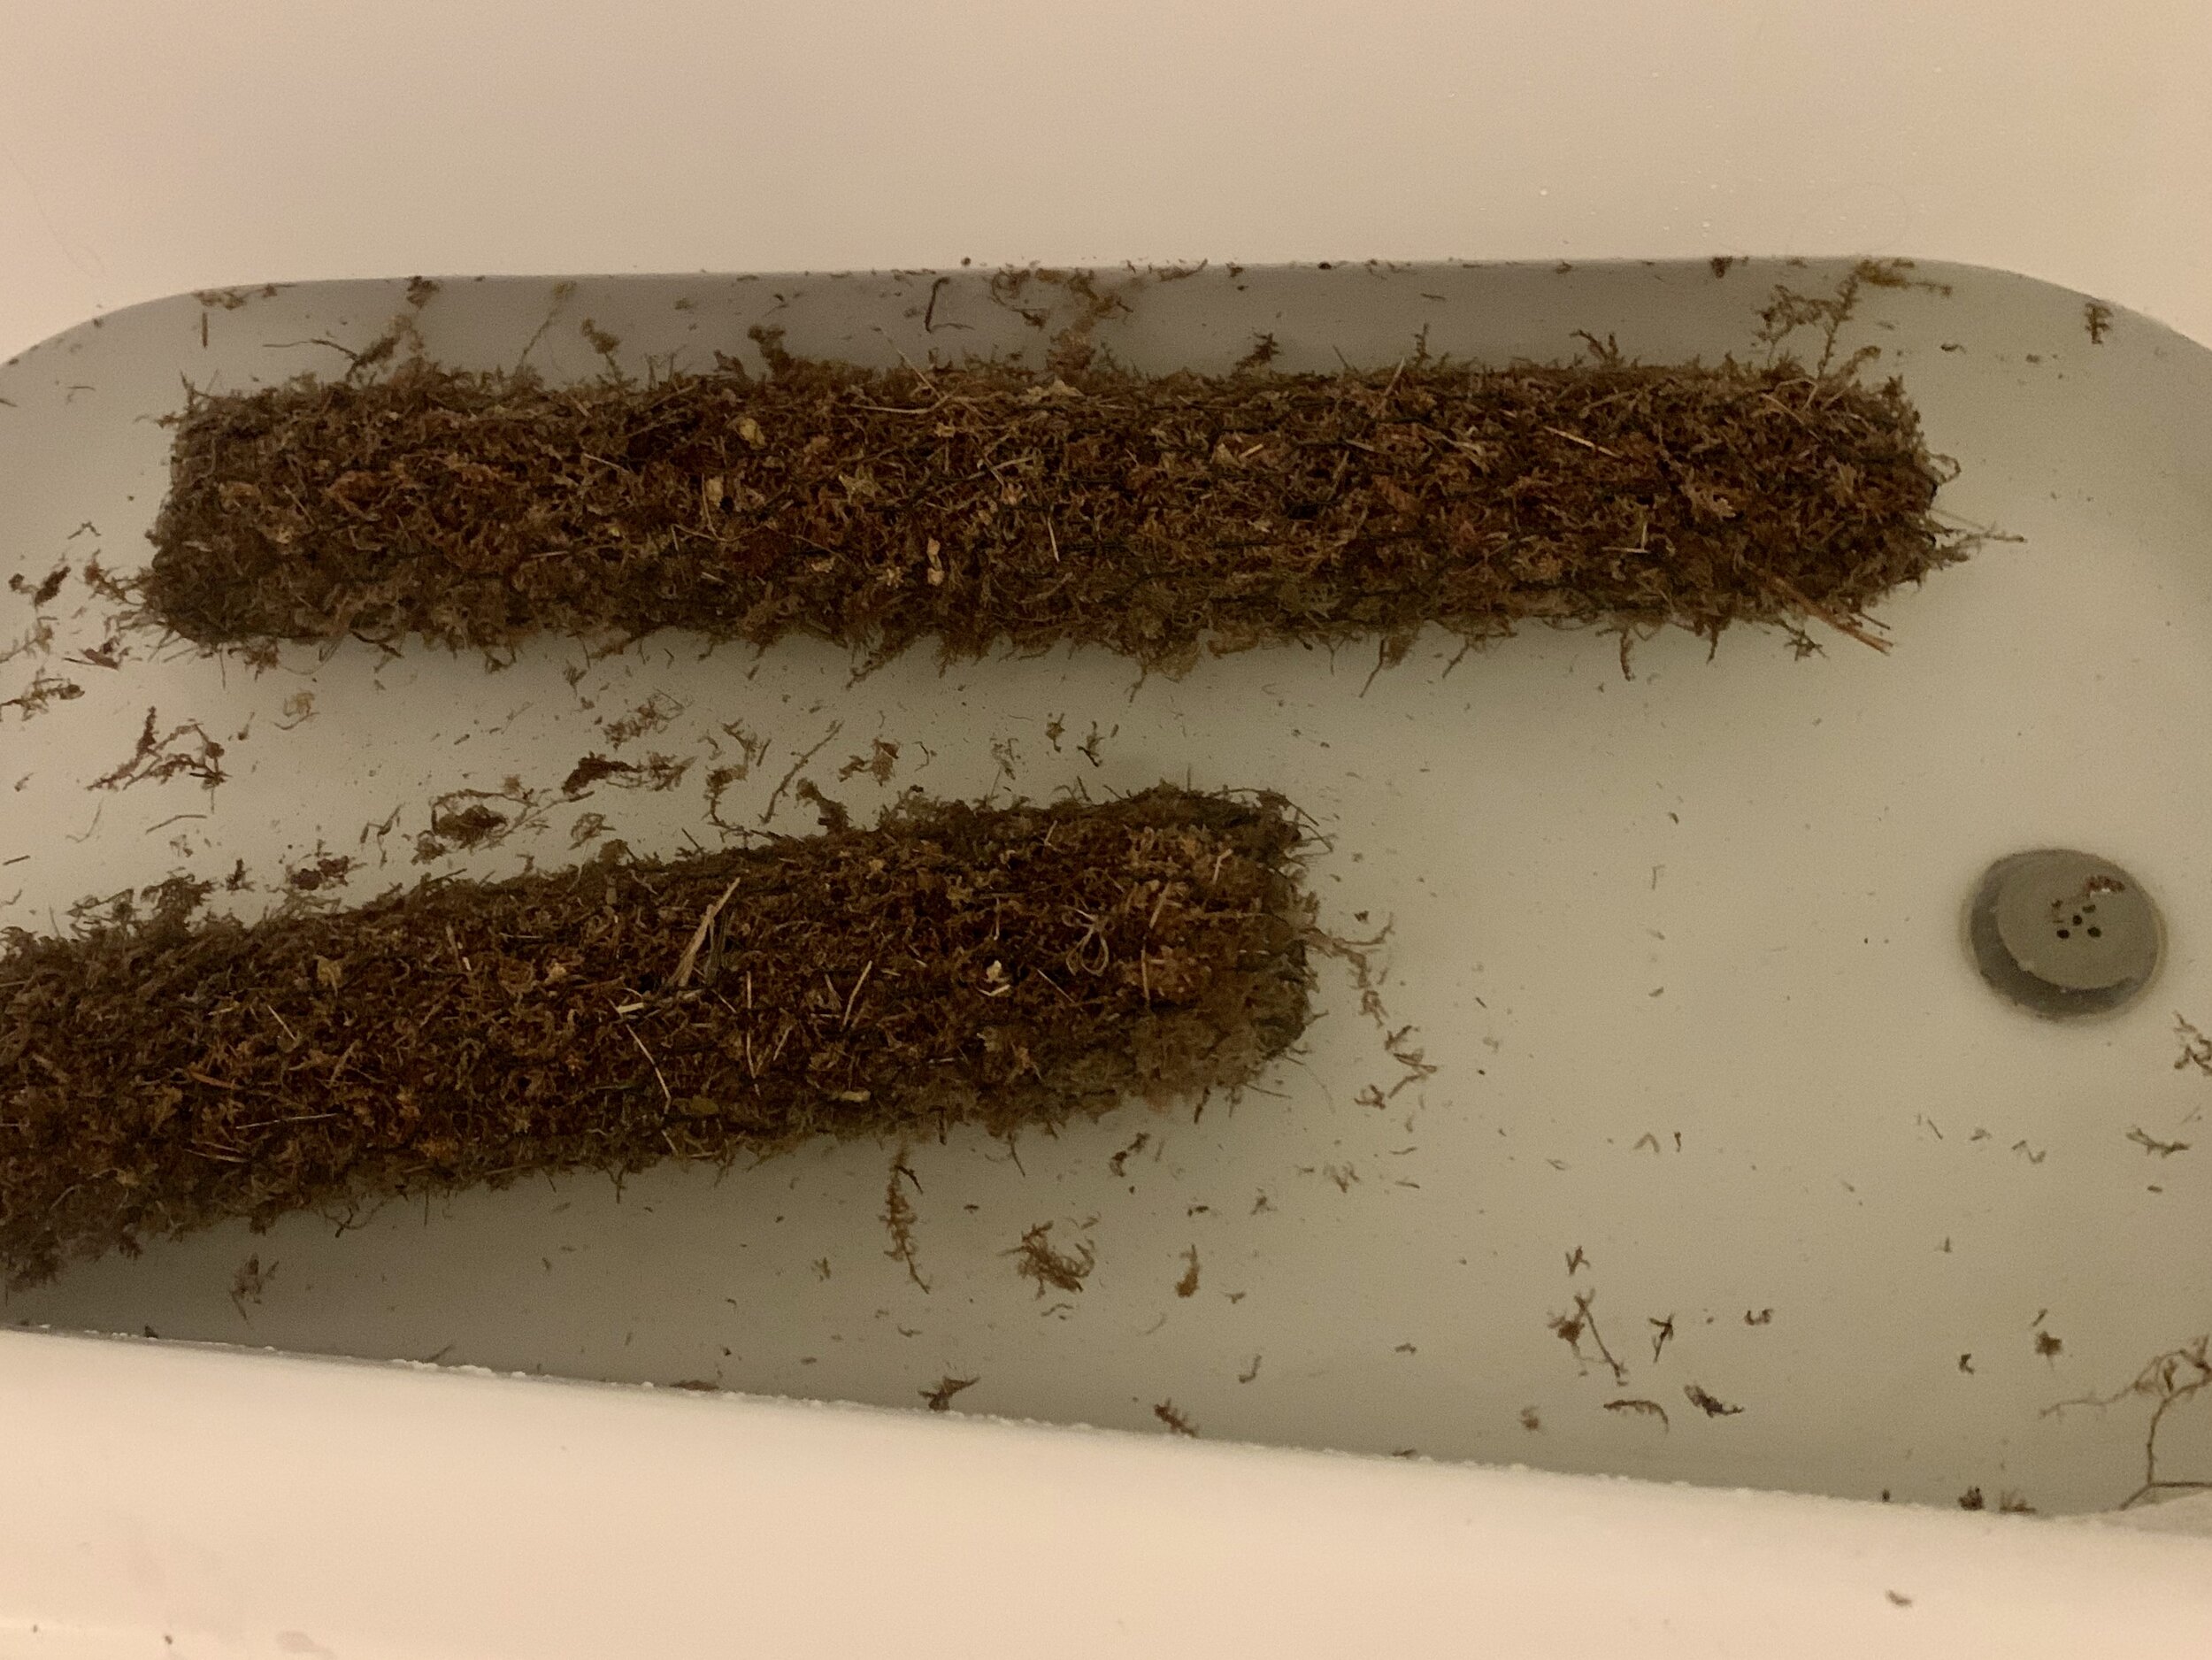
The first step in my moss log making process was identifying the correct type of moss and where to buy it. Luckily, I have a really knowledgeable contact at my local floral wholesaler, Colleen, who was able to help me to identify sphagnum moss as the best option for my end use. With this in mind, I went out and bought (what I thought was) sphagnum moss for my moss logs from my local home improvement store. As a word of caution, from my own personal blunder, sometimes sphagnum moss is intended to be used in conjunction with dirt to help with moisture retention. When this is the case, it will be too finely shredded for the moss log application…
Exhibit A (see image below) : the image on the left is finely shredded sphagnum moss to be used with soil, it’s basically dirt and isn’t suited for moss log creation; the image on the right is long, fibrous sphagnum moss and is ideal for moss logs.
A trip to my local nursery later, I finally had the correct kind of moss in hand and I was ready to get started.
On a side note, if you are looking for a steep discount on a gently used bag of finely shredded sphagnum moss, please send me a message ;-)

In order to create the moss logs, I used floral chicken wire and several pieces of 22 gauge florist wire. I placed the sphagnum moss on 1 layer of chicken wire, being sure to place enough that the log could hold its structure, but not too much as to make it difficult to insert the flower stems. Unfortunately, figuring out the right amount of moss to put inside of the chicken wire is not an exact science, but can be easily determined through some good old fashioned trial and error.
Once the moss was placed on the 1 layer of chicken wire, I used the 22 gauge wire to “sew” the 2 sides of the chicken wire together. I then tucked in the short ends of chicken wire on themselves to round out the end of the log and ensure that the moss was secure on all sides.


Once my moss logs were assembled, it was time to soak them with water. In order to ensure that my moss logs were evenly saturated with water, I decided to soak them in my bathtub. I filled my bathtub roughly half full with cool water and flower food. While my plumbing was not pleased, I was honestly impressed with how little debris came off of the logs once placed in water, as can be seen in the image below. Had the moss logs been smaller, I think that they could have been soaked in a bucket of water or sink, as opposed to a tub, but for my purposes I found the tub to be quite effective for ensuring even soaking.
After I was satisfied with the amount of saturation, I placed the logs in a plastic container to allow for any excess water to drain off prior to arranging.
The most exciting part about this step in the process is that you can really start to treat your moss logs the same way you would treat your floral foam. For instance, for the design pictured below, I ended up taping the moss log into a plastic tray and I was able to design into the log on that tray. The tray allowed for the easy transportation of my design and also caught any loose moss or displaced water, protecting the table the design was ultimately placed on.
(Look at how happy I am to be sporting such an eco friendly design!)

Since my other two moss logs were being used outside and I wasn’t concerned about catching any displaced water or moss, I was able to place these moss logs right on the ground. I placed one of the them at the base of my floating arch and the other on the opposite side of the floating arch. I was able to design into these moss logs on site and with most of the same ease as floral foam, though I did find better success using water picks for the weaker stemmed flowers (such as ranunculus and tulips).
Knowingly, I am still early on in my eco friendly floral journey, but I am excited about the results of my first “moss log” experiment. In addition to replicating the ease of floral foam without the environmental impact, I am currently drying out the moss to be used for future moss log endeavors, so my wallet is pretty happy too.
Eco friendly and eco chic, moss logs are a floral tool that this florist can get behind.

From Fashion to Flowers
From fitting clothing to crafting custom blooms, learn a little bit more about the face behind the flowers and my journey of going from a fashion designer to a floral artist.


You may not be familiar with my story, but my love for creating and design didn’t start with flowers.
From a young age, I was always very particular about what I wore (just ask my mom who had to search high and low for pink “gellies”, when they were the only kind of shoes that I would wear as a kid). This personality quirk of mine didn’t stop at clothing. I always had strong feelings about what color the walls in my bedroom should be painted and was enlisted at a young age to go furniture shopping with my mom. I was known for having very decisive “design” opinions and I never shied away from sharing them.
So when the time came to determine what I would study in college, you might be surprised to hear that I actually applied to be a dietitian… because if you want to be successful you have to be some kind of a doctor, right? Just to be clear, I have mad respect for anyone who puts in the work to become a doctor, but I personally wasn’t looking to become a doctor for the right reasons. I was always worried about being smart enough or accomplished enough growing up, so I was searching for something to give me that kind of validation. I was never the straight “A” student or homecoming queen type of person in high school, no matter how hard I tried, so I was determined to make the rest of my life different and that started with college.
With an acceptance letter in hand from Purdue University into the dietetics program, I went for a “day on campus” visit prior to starting my freshman year. As fate would have it, in the same college that housed dietetics there was also a program called “Apparel Design and Technology”. As I stood there with my dad, waiting for the balance of the future-dietitians to show up, I had this achey feeling in my gut…
I didn’t want to go with the future-dietitians, I wanted to find out more about this apparel design program.
Luckily my dad is a super supportive guy (and he was honestly just so happy that I was going to his alma mater), so we made the switch right then and there - we would spend my “day on campus” with the apparel design group instead of the dietetics group. That day was a game changer for me - for the first time in a long time I felt like I had found a group of like-minded people. We loved clothing, we embraced our own personal styles, and ultimately we loved creating - I was home.


I quickly came to realize that taking on an apparel design degree was so much more than just designing clothing. It required all-nighters of draping clothing on dress forms and putting the final pencil markings on my drawing class projects, followed by long days of fitting garments on models and taking accounting classes. The funny thing is though, that when you love what you do, it’s true that it never really feels like work.
Throughout my time at Purdue and in the Apparel Design program, I had finally learned to accept the creative side of me as the most powerful (and empowered) part of myself. It didn’t matter that I wasn’t a prom queen anymore, I was finally just me and that was enough.


After four years at Purdue, a study abroad adventure in London (which I’m certain I’ll share more about in a later post), and a successful (slightly over the top) senior collection, I was ready to pursue a career in the apparel industry. The apparel industry is notoriously difficult to get into though, especially with a paying job fresh out of college, so I was lucky enough to get a position at Abercrombie and Fitch corporate office as a technical designer.
Being a technical designer was definitely a departure in ways from my college education. Instead of focusing on all aspects of garment creation (inspiration —> to final product), I was now being asked to focus more on things such as ensuring the best possible fit, determining the correct construction, and communicating revisions to my vendor partners. While creativity was an aspect of my role at A&F, being a technical designer definitely tapped more into my analytical side.
In total I spent 9 years at A&F as a technical designer, working on a variety of different product categories during that time, from dresses to intimate apparel. I truly loved my job and the people I worked with and, in many ways, I feel that those 9 years were the years when I became an adult. Those 9 years forced me to come to terms with my own character flaws and helped me to establish coping mechanisms for dealing with stress and anxiety, while still executing at my highest caliber.
I didn’t realize it then, but this job was giving me the skillsets I needed to start my own business in flowers.
Even though I loved my job, the reality was that my creative side was begging me for more - more time and space to try to realize its full potential. I started to view arranging flowers as more than just a fun hobby that I did from time to time and instead as a potential career path. Arranging flowers had always been a little retreat for me from my everyday life. Post-college there would be days when I wanted to get crafty and create something for fun, but making a garment from nothing took hours or even days. Creating clothing as a hobby no longer melded with my demanding corporate schedule, but arranging a vase of flowers took mere minutes…
So I began to realize that while arranging flowers also demanded creativity, it was on a scale that I was able to offer at the time.


In order to go from a hobby florist to owning my own floral company, I sought out an education in floristry to teach me all of the techniques and tricks behind great floral design. I found that education in an online program, which at first I was wicked skeptical about - how can you teach someone design online? The great thing about my apparel background though, was that I already understood design. I knew what colors looked good together and which ones didn’t. Out of instinct, I could tell when something was great or maybe just a little bit off. So my online floral education was really to try to understand cut flowers and floral techniques better…
How do you keep flowers fresher for longer?
How do you manipulate flowers, while still keeping true to their natural form?
How do you create a classically wired cascading bouquet, Kate Middleton style?
The online course allowed me to build the confidence I needed to officially leave my corporate job of 9 years to pursue Blümen full time.
Even though the start of Blümen hasn’t been without it’s setbacks (I’m glaring at you, COVID), I have found that my creativity and apparel design background have shown up in ways that I could have never anticipated. This time and space at the beginning of my business has given me the opportunity to fine tune my flower design skills, expand my business to arrangement delivery, and has also allowed me to discover my love for wearable flowers.
So while the path from fashion to flowers has been in many ways an unexpected one, I truly feel that every step I’ve taken along the way has led me to becoming the kind of florist and designer I was always meant to be.


Grocery Store Glow Up
Do you feel like grocery store flowers leave you feeling less than inspired? I’ve been there! Check out this blog and get ready to be inspired - when you are willing to get creative and a little scrappy, there is no limit to how you can transform those grocery store blooms.

When I started working with flowers more regularly a few years ago, I would get my flowers from the same place most people do - the grocery store. Sometimes I would be frustrated by the pre-made bouquets and what felt like a lack of unique flowers and greenery…
How was I going to make something special and unique for my friend’s birthday or a work baby shower?
The more times I encountered this feeling of dread when trying to pump myself up about shopping for flowers at the grocery store, the more empowered I felt after the fact to find a way to build confidence with grocery store blooms. This new found empowerment gave way to my own research about things like, “the best grocery stores to buy flowers from” and “simple flower arranging techniques.” I was looking for accessible ways of arranging flowers from home that wouldn’t break the bank or require a trip back to college…
I was on the hunt for a true grocery store glow up.
With the end goal in mind, the first thing I needed to address was my supply chain (aka the grocery store I was shopping at). Over time, I have found that I have the most fun arranging and the most success when I go to grocery stores that sell flowers and foliage in separate bunches. Being able to buy separate bunches allows you to pick and choose unique color combos and a variety of textures. Some of my go-to grocery stores for this type of purchasing are Trader Joe’s and WholeFoods.
I realize that not everyone has stores like this in their area, but have no fear, pre-bundled bouquets from your local store are also a suitable substitute. To help glow those pre-packaged bouquets up a little bit, I would recommend some of the following solutions :
Try buying more than one bouquet, so you can mix and match components and ditch the flowers or greenery that bum you out.
Find a unique container that complements the flowers that are available. Who said that kitschy looking bowl from your Aunt Linda needed to be banished anyways?
Look into adding unsuspected elements to your design, such as some greenery you foraged from your backyard - OR - invest in some dried grasses from your local craft store that can be used sparingly and saved for future arrangements.
When you are willing to get creative and a little scrappy, there is no limit to how you can transform those grocery store blooms.
Once you feel like you’ve identified the best grocery store in your area for buying flowers, the first step in your grocery store glow up is to go on the hunt for some floral gems.


For this blog post, the store I decided to visit offers flowers and foliage in separate bunches, so I was able to select ingredients to do a predominantly yellow and purple color palette with some burnt orange mixed in. My haul featured sunflowers, two different colors of mums, eucalyptus, mini carnations, stock, and alstroemeria. The great thing about all of these materials is that they are economical and, when purchased fresh, have a long vase life.

With flowers in hand, there are just a few more supplies you will need from around your house. This list of supplies includes :
A bowl or vase to arrange in (hello kitschy little mixing bowl!)
Scissors for cutting stems
Tape for creating a structure on the bowl
Fresh, cool water (temperature-wise, but if it just happens that your water is really awesome as well, that is also acceptable) with flower food mixed in
Once you have all of your materials gathered, it’s time to get to work arranging!


The first step in the glow up process is creating a structure on top of your bowl. To create this structure, start by placing four rows of tape across the top of the bowl to create a “checkerboard” pattern. Once the four rows of tape are applied, wrap an additional piece of tape along the side of the bowl (aligned with the top edge) to secure down the individual ends of the “checkerboard” tape. This additional piece of tape along the side of the bowl will prevent your structure from collapsing as you work with your flowers.
Believe me… there is nothing more frustrating that your structure failing when you are in the middle of arranging.
Once your tape structure is in place, pour in your prepared water so the container is about 2/3 full, and start to “green” your arrangement. By “green” I mean that you should place almost all of your greenery first, and this is for a few different reasons :
The greenery will allow you to start to form / decide the shape you would like your arrangement to have (for me, I decided to make my arrangement low to the bowl and extending out horizontally).
Greenery tends to have firmer / thicker stems, so it allows you to create a supportive place to nestle in some of your flowers with smaller or weaker stems.
To green the arrangement, cut the stems of greenery (in my case, eucalyptus) to the desired length, and place the stems in the container at an angle, purposefully crossing the stems over each other (keep thinking about creating cozy pockets for your flowers with weaker stems as mentioned in point #2 above). As you place the stems in the water, make sure to remove any and all foliage that would fall below the water line. Foliage and petals below the water line will shorten the life of your cut flowers, so when in doubt, pull those leaves off.
(If you don’t have any greenery, you can skip straight to this next step.)


Once the greenery is in place, start to fill in with some of your “filler” flowers, which for me was some yellow alstroemeria. You can usually tell that something is a filler flower, because it tends to be smaller in scale and there will be multiple flowers per stem. As you place the filler flower, follow a similar technique as the greenery by purposefully crossing the stems over each other in the container, all while keeping in mind the overall shape you are hoping to achieve at the end.
With the initial filler flowers in place, next incorporate your “line” flower, for my arrangement that was some purple stock. Usually you can tell that something is a line flower, because in general it is very long and thin, like a line. This purple stock added some brightness to the arrangement and helped to further establish the overall shape I was looking for.
The great part about this point of this process is that between the greenery and filler flowers, the structure within the container is starting to become quite strong. So while it is ideal to cross over the stems as much as possible, it is no longer necessary. I was able to place the stems of my stock as I wanted them within the bowl.


After you feel good about the placement of your filler flowers, line flowers, and greenery, next you should move onto your “focal” flowers - for me this was my yellow mums, orange mums, and sunflowers. Focal flowers are usually your biggest flowers - they bring the "wow” factor. When placing your focal flowers, make sure that there are some in the front, sides, and back at varying levels. This variety of placements within the container and “levels” (lower and higher up in the container) create interest and allow the viewer to be “carried” visually through your design.
As a side note, I tend to place at least one bloom very low in the front of my arrangement to really bring attention to the true “front” of my arrangement. In this instance it was a single yellow mum, which can be seen in the finished product photo.


With the majority of your blooms placed and the real estate inside of your bowl quickly disappearing (or was it just me?), it’s time for the finishing stages! For me this included placing my last filler flower (mini carnations) and adding any additional foliage or filler flowers that I felt like my arrangement was missing.
To complete the arrangement and place your final blooms, look for any empty spaces that need covered or areas in the arrangement that need a pop of color. I always like to make sure that none of my mechanics are showing, which in this case is tape, and that none of my materials are “one hit wonders” - by that, I mean that they only pop up randomly in one place, never to be seen again…
(I’m looking at you Hanson brothers.)


Once all of the blooms are placed, stand back and take a look...
Does anything look out of place? For me, it was my initial placement of the sunflowers, so I pulled a few of them out, trimmed them and placed them back in better positions in the container.
Is there too much of any one flower or foliage in a particular spot within the container? In these cases, I either pulled out that stem or cut a leaf or bloom off of it to lessen the visual weight of that material.
If you can tell something is wrong with your arrangement, but you can’t quite pinpoint what, I would suggest taking a picture of your arrangement and reviewing it that way. I can’t tell you the number of times I have personally identified tweaks that my arrangement needed after snapping a picture. Sometimes things just look different through a camera lens.
My final piece of advice, when reimagining those grocery store blooms, is to have fun and don’t overthink it. All of these tips and tricks are great for a grocery store glow up, but just remember that flowers are meant to be fun and personal, so find a way to create that works for you, and I promise that it will show in your finished product.


Eco-Chic Styled Shoot
From finding inspiration to executing my vision, in this blog post I break down how this eco-chic styled shoot came to be.

Photo Credit : Angela Fortin Studio
I have always been a creative person, which has come in handy on more than one occasion. For instance, when taking art classes in college and I got a smudge on my project the night before it was due - how would I blend it in purposefully? Or I ran out of the fabric I had planned to make that skirt out of - what would be the best way to make this miscalculation look intentional?
(Have I mentioned before that my background is actually in apparel? It’s amazing how often that experience helps me out as a florist.)
So while an eco-friendly styled floral shoot is a departure from my crazy college art and apparel days, you can imagine how excited my creative-side became by the idea - any flowers, any colors, in any form… talk about creative freedom. Sometimes that amount of creative freedom can become crippling - so where do you go from here?
In order to narrow my focus, step one in creating a vision for my styled shoot was determining a color palette. To be totally honest, you can have the prettiest flowers in the world, but if the colors don’t complement each other, it just doesn’t work. With that in mind, I wanted the color palette to evoke the feeling of transitioning from summer to fall (bonus points if it included my favorite color, mustard yellow), which led to the split complementary color palette below.
What can I say, I’m also a color theory nerd!

With a color palette landed, it was time to start sourcing materials. When sourcing materials I take into consideration a slew of important concepts, such as :
What flowers and greenery are in season?
What materials do well out of water? - OR - What materials don’t need water at all? (hello dried goods!)
What materials give me not only the color variety, but the textural variety I crave as a designer?
How much of each material do I need to execute my vision? (To be totally honest, this is probably the part of the process that takes me the longest)
With the color palette established and all of the above questions taken into consideration, I placed the order for the necessary materials two weeks in advance of the shoot. Now it was time to sit down and wait…
Wait a minute… that’s not right, I still had a ton to do!
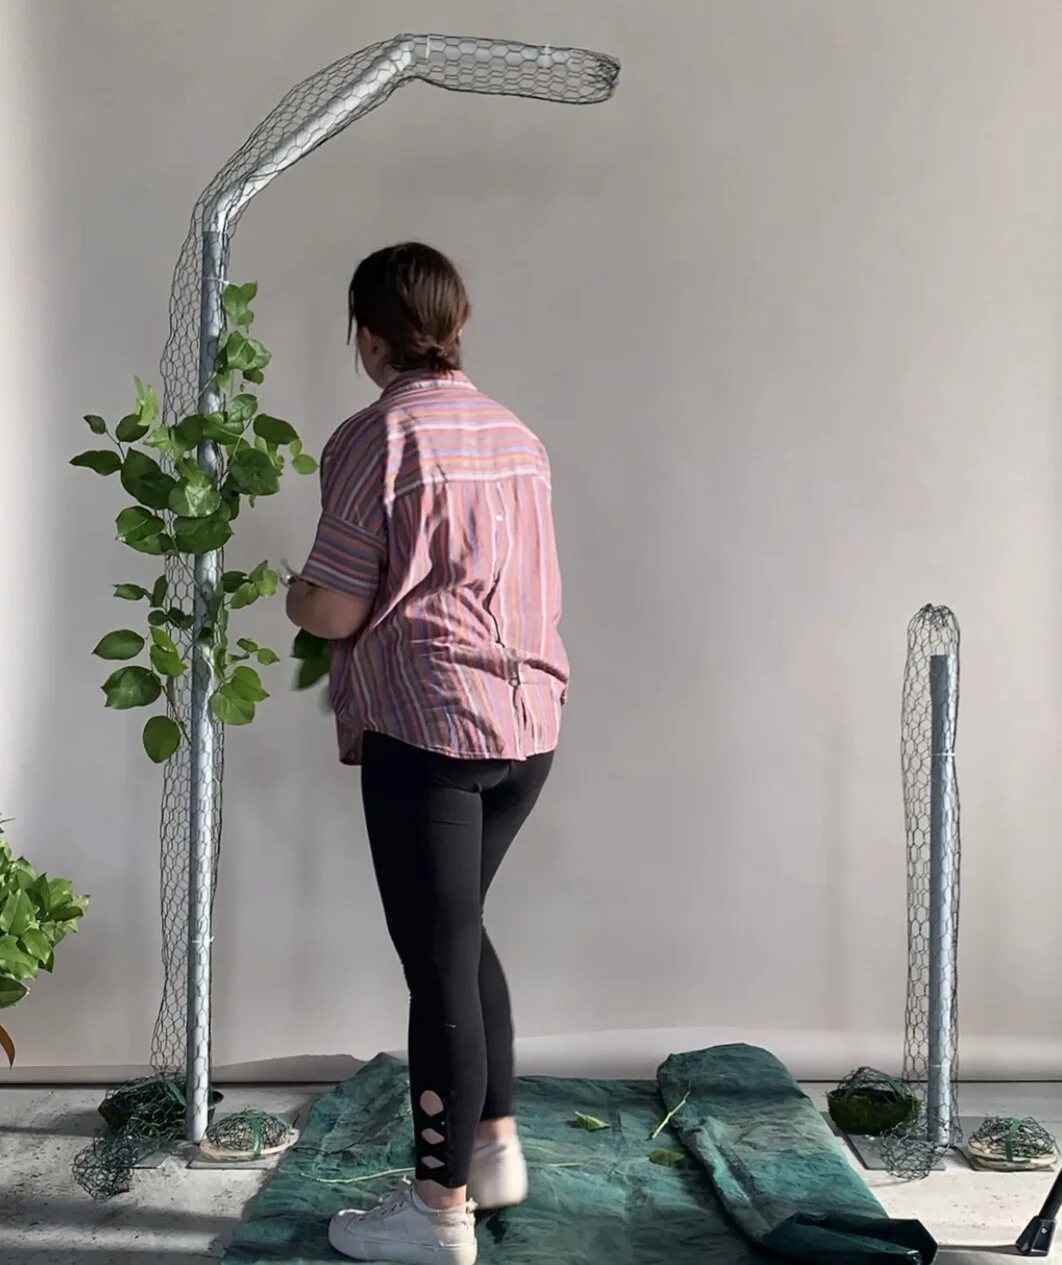
With all of my materials ordered, I started to research the best “foam-free” floral arch techniques, which ultimately drove the final design for my arch mechanism. After much research, I landed on a PVC pipe structure covered with floral chicken wire. All elements of this design are water resistant and won’t rust, so they can be used again and again. With this in mind, I went about sourcing pipe and drape bases (which I scored used, so my wallet was extra happy about that one) and corresponding PVC pipes and fittings. Once everything was assembled in the desired shape, I covered the entire structure with chicken wire - I even left a little bit of chicken wire extending past the bases for a dramatic “garland” effect on the floor.
I’m all about the drama, what can I say?
Before I knew it, the two weeks before the shoot flew by and it was time to pick up and prep all of the materials I had sourced. This is where a lot of the not so glamorous behind-the-scenes work happens. It is so important for the longevity of your cut flowers and greenery that they are properly conditioned and hydrated (or as I like to say, they need a chance to drink). Without this step, the success of a foam free installation is doomed from the start. So two days in advance of the shoot, I processed and conditioned all of my flowers for the eco-chic fun that lie ahead.
Having given my flowers some time to hydrate, the day before the shoot I crafted the bouquet and all-leaf wearable that would be featured elements within the photoshoot. This sort of work is the best kind to do a day or two before the shoot / event, because the bouquet will still have an active water source and the wearable will be getting further “hydrated” in the cooler (that concept is a little bit more complicated and I’ll reserve it for a future blog post, I promise!).


The day of the shoot, it was all excitement and butterflies - I had done the prep work, but now it was time to execute the vision. I woke up bright and early to set out for Angela’s photo studio, with a whole carload in tow (plus some - this was a 2 car trip kind of endeavor). In total it took me a little over 3 hours to assemble the eco-chic floral arch and arrange some flowers in the back of my tricycle (aka the Blümen bike). The actual assembly was a lot of work, but it honestly paled in comparison to the thought and prep work that went into it - in floral design, preparation is key!
After weeks of prep work and hours of installation were complete, the final thing on my list of things-to-do was to style myself and have some fun. I’m not someone who naturally gravitates towards the camera, but it is so incredibly important to me in these strange times we are going through, that you know who I am. Every design, arrangement, or over-the-top idea flows through my mind and out of my hands. I wanted the photoshoot to show this, along with my love of flowers and the joy I feel bringing them to all of you.
As things began to wind down and I started to tear down my eco-friendly floral arch the thought crossed my mind… “This is why I decided to switch career paths at 30 years old, this is what I am meant to be doing.”
Corny? Maybe. The reason I’m a good florist? Definitely.

Photo Credit : Angela Fortin Studio
